
How to Soundproof a Drum Room

Mon Sep 16 2024

Soundproofing your drum room: a complete guide
Soundproofing a drum room can be a challenging task, especially if you’re aiming for budget-friendly options. This guide offers practical tips that are easy to follow and can be implemented with basic DIY skills. By identifying some ‘quick wins’, you should be able to improve the sound insulation of your music room and maybe give the neighbours a break.
Understanding noise transmission
Airborne noise refers to the transmission of sound through the air around us. It’s what most people think of when discussing sound, for example, music playing on speakers at a festival or a dog barking next door.
Impact noise refers to the transmission of sound through the solid structure of the building. It’s usually created by an impact that vibrates through a solid surface, generating sound waves. An instance of this could be hearing the footsteps of neighbours in the flat above you or a knock on your front door.
Choosing the optimal room
When it comes to soundproofing, the room you choose can make a significant difference. Ideally, a basement room is your best option. In a basement, you don’t have to worry about disturbing anyone below or adjacent to you, leaving the ceiling as your primary focus.
If a basement isn’t an option, choose a room that doesn’t share walls with neighbours or the outdoors. This way, sound has to travel through additional rooms before escaping.
Furthermore, selecting a room with the fewest doors and windows will minimise weak points where sound can leak. By carefully choosing the right room, you’ll create a solid foundation for effective soundproofing.
Choosing the right equipment
Low volume cymbals
These typically have multiple holes to reduce the mass of the cymbal, significantly reducing the volume and lower frequencies.
Electronic drum kits or pads
Using an electronic drum kit with mesh heads is an easy way to significantly reduce the amount of noise coming from your drum room. Alternatively, you can replace the heads on your normal acoustic drum set with electronic pads to transform it into a low-volume version of your regular setup.
Silencer pads
A quick but temporary solution is to simply attach these to your standard acoustic kit, which will help dampen the sound.
Muffle your bass drum
Removing the resonant head and filling the cavity with sound absorbing household items such as cushions, blankets, and towels will significantly dampen the sound.
Insulating the floor
Utilising a rug or mat
Placing your drum set on a rug or mat will help insulate the floor from impact noise. Adding a thick rubber layer or interlocking foam tiles underneath the rug will provide even greater noise reduction.
Building a raised platform
If you have strong DIY skills and wish to further isolate impact noise, consider building a raised platform or drum riser for your drum kit. It doesn’t need to cover the whole room.
You will need rubber isolating pads to separate the new timber joists from the existing floor. Next, fill the space between the joists with mineral wool insulation. Finally, place plywood or OSB on top of the joists to create the platform. This solution effectively reduces impact noise from spreading throughout the building.
Sealing gaps and holes
An airtight space is excellent for acoustic insulation, just as it is for thermal insulation in a house. Any gaps in doors, windows and walls provide pathways for sound to escape. Properly covering or sealing these gaps can be ‘easy wins’ that contribute to creating a soundproof drum room.
If you can’t identify gaps by listening, turn off the lights and use a torch on the other side of the door to spot any gaps around the edges. Properly fitted rubber or foam seals are very effective at blocking sound. Threshold and drop seals work well for gaps under the door, though they can be somewhat tricky to install yourself.
If the door to your drum room is hollow, it will be a weak point that allows noise to pass through easily. Replacing it with a solid door, or even better, a fire door with increased mass and effective seals will significantly improve its ability to block both fire and unwanted noise.
Does acoustic foam stop sound escaping?
Unfortunately not. Low-cost acoustic foam or ‘egg boxes’ applied to the walls won’t prevent sound from escaping the room. These treatments absorb sound inside the room, lowering reverberation and improving the sound quality of the space. Applying acoustic absorbing panels to the room is a great idea; however, thin foam panels from Amazon won’t do much for the high frequencies produced by a drum kit.
Low frequency absorption
Consider adding some low-frequency absorption or bass traps to the space. Chunky triangle profile absorbers are commonly placed in corners to make efficient use of space. In larger rooms, suspended rafts or wall panels with a glass wool core are often used in professional studios. Ensure that the absorbing material is at least 100 mm thick to effectively address lower frequencies.
Cavity insulation and high mass barriers
Good insulation and barriers (such as walls, ceilings and floors) with high mass are key to effective soundproofing. Insulation is often omitted from internal partitions and floor cavities because thermal insulation is less critical in these areas. It’s worth double-checking whether there is insulation between the studs in your walls or the joists in the floors above or below, as your builder may not have anticipated your need for acoustic insulation. While checking for existing insulation is straightforward, adding it later can be more challenging.
If there is sufficient insulation but only one layer of plasterboard, adding more mass to the wall will enhance its sound-blocking capabilities. This can be done with another layer of plasterboard and incorporating mass-loaded vinyl (MLV).
Mass-loaded vinyl ‘sandwich’
Ideally, you should create a mass-loaded vinyl ‘sandwich’ with two sheets of plasterboard as the ‘bread.’ If you already have a layer of plasterboard in place, apply Tecsound with a self-adhesive backing to the entire wall. Then, add the next layer of plasterboard, staggering the joints if possible.
In the UK, Soundbloc plasterboard will be the best product to use. It is blue in colour, comes in 12.5mm and 15mm thicknesses, and provides excellent acoustic performance.
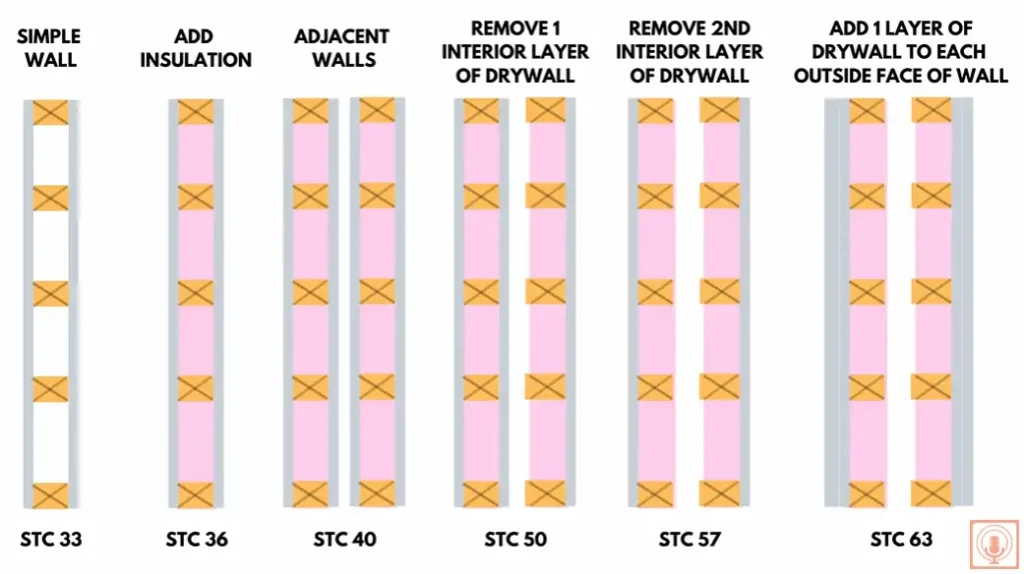
Increasing space between plasterboard layers
Understanding the physics of soundproofing can end up saving you time and money. In the below illustration of plasterboard wall sections, compare the third example with an STC of 40 to the last example with an STC of 63. Although both use the same amount of materials, the last design creates a single large cavity instead of three smaller ones. This design offers significantly better sound insulation and performs much better at the lower frequencies produced by a drum.
Conclusion: Drumroll please…
Soundproofing a drum room requires a combination of strategic planning and practical implementation. By understanding how sound travels, selecting the optimal room and equipment, and using appropriate acoustic materials, you can significantly reduce the impact of noise disturbances caused by your drumming sessions.
References
“What Is the Triple Leaf Effect in Soundproofing?” Soundproof Your Studio, 25 Mar 2024, www.soundproofyourstudio.com/blog/what-is-the-triple-leaf-effect-in-soundproofing.